ナビゲーションバーは、スマホ画面の一番下に複数のアイコンを表示して、そのアイコンを押してスクリーン表示を切り替えます。
実装は簡単です。
基本的なコードの書き方の手順と、注意点をまとめました。
この記事では、「Flutter New Project」の「main.dart」のMyHomePage()を改変して実装していきます。
- Flutter : 3.24.4
- Dart : 3.5.4
準備
遷移先の画面を作成
まずは、NavigationBarから遷移する画面を作ります。
ここでは3画面を用意します。
遷移先画面のdartファイルは、[lib/screens/]のフォルダ内に3ファイル作りました。
- top_screen.dart(トップ画面)
- favorite_screen.dart(お気に入りを表示する画面)
- info_screen.dart(お知らせを表示する画面)
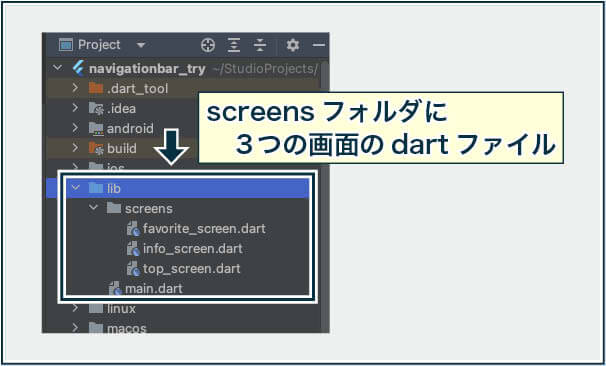
とりあえず遷移先があればいいので、画面が識別できるText()だけ入れてあります。
top_screen.dart
import 'package:flutter/material.dart';

class TopScreen extends StatelessWidget {
  const TopScreen({super.key});

  @override
  Widget build(BuildContext context) {
    return const Center(child: Text('Top Page'));
  }
}
favorite_screen.dart
import 'package:flutter/material.dart';

class FavoriteScreen extends StatelessWidget {
  const FavoriteScreen({super.key});

  @override
  Widget build(BuildContext context) {
    return const Center(child: Text('Favorite Page'));
  }
}
info_screen.dart
import 'package:flutter/material.dart';

class InfoScreen extends StatelessWidget {
  const InfoScreen({super.key});

  @override
  Widget build(BuildContext context) {
    return const Center(child: Text('Info Page'));
  }
}
遷移先画面をリスト変数に格納
次に、遷移先画面のクラスをリスト形式の変数に格納します。
リストに入れる順番は、ナビゲーションバーに表示する左からの順番にします。
リスト変数を作成する場所は、Stateをextendsして作った_MyHomePageStateの中です。
class _MyHomePageState extends State<MyHomePage> {
  // NavigationBarから遷移する画面を、左から並べる順番にリストに入れる
  final _screens = [
    TopScreen(), // 1番目(0)
    FavoriteScreen(), // 2番目(1)
    InfoScreen(), // 3番目(2)
];各dartファイルは、冒頭でimportするのも忘れずに!
import 'package:navigationbar_try/screens/top_screen.dart';
import 'package:navigationbar_try/screens/favorite_screen.dart';
import 'package:navigationbar_try/screens/info_screen.dart';
画面を識別する変数(int)を作成
NavigationBar()に表示されるアイコンは、一番左から「0」「1」「2」という番号で識別されます。
この識別番号を_currentIndexという変数で切り替えて動かすことにします。
初期値にはTopScreen() が表示されるよう、0 を代入します。
  // 表示する画面を指示する番号(初期値は「0」の TopScreen() )
  int _currentIndex = 0;
トップ画面を表示する
画面を格納したリスト変数と、画面を識別する番号の変数が作れたので、この変数をScaffoldのbody:に指定して「トップ画面」を表示します。
  @override
  Widget build(BuildContext context) {
    return Scaffold(
      body: _screens[_currentIndex],
    );
  }
NavigationBarの実装
NavigationBar()は、ScaffoldのbottomNavigationBar:に指定します。
遷移先の画面を示す配列番号の指定
bottomNavigationBar:にNavigationBar()を指定したら、selectedIndex:に「遷移先の画面を示す識別番号」を設定します。
この番号は、先に作った_currentIndexで指定できます。
  @override
  Widget build(BuildContext context) {
    return Scaffold(
      body: _screens[_currentIndex],
      bottomNavigationBar: NavigationBar(
        selectedIndex: _currentIndex,
      ),
    );
  }
遷移先画面を配列指定
次に、NavigationBar()のdestinations:の引数リスト[ ]に、NavigationDestination() を並べて渡せばOK。
下のコードは、一番左に表示する「トップページ」のアイコン1個分です。Icon(Icons.android)で、ドロイド君アイコンを表示してみました。
NavigationDestination(icon: Icon(Icons.android), label: 'トップページ'),アイコンに色をつけるときは、Icon()の color: で指定します。
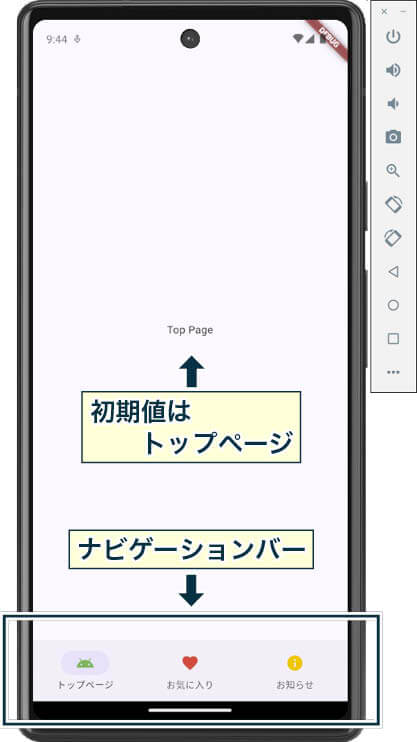
NavigationDestination(icon: Icon(Icons.android, color: Colors.green,), label: 'トップページ'),ここまでで、とりあえず見た目の形ができました。
  @override
  Widget build(BuildContext context) {
    return Scaffold(
    body: _screens[_currentIndex],
      bottomNavigationBar: NavigationBar(
        selectedIndex: _currentIndex,
        destinations: [
          NavigationDestination(
              icon: Icon(Icons.android, color: Colors.green),
              label: 'トップページ'),
          NavigationDestination(
              icon: Icon(Icons.favorite, color: Colors.red),
              label: 'お気に入り'),
          NavigationDestination(
              icon: Icon(Icons.info, color: Colors.amber),
              label: 'お知らせ'),
        ],
      ),
    );
  }
レイアウトが完成
画面の描画処理(setState)
次に、NavigationBarのアイコンが押されたときの処理を作ります。
destinations:の次に、onDestinationSelected:を挿入して、setStateで変数を書き換えます。

  @override
  Widget build(BuildContext context) {
    return Scaffold(
      body: _screens[_currentIndex],
      bottomNavigationBar: NavigationBar(
        selectedIndex: _currentIndex,
        destinations: [
          NavigationDestination(
              icon: Icon(Icons.android, color: Colors.green), label: 'トップページ'),
          NavigationDestination(
              icon: Icon(Icons.favorite, color: Colors.red), label: 'お気に入り'),
          NavigationDestination(
              icon: Icon(Icons.info, color: Colors.amber), label: 'お知らせ'),
        ],
        onDestinationSelected: (int index) => setState(() {
          _currentIndex = index;
        }),
      ),
    );
  }
これで、NavigationBarの実装が完成です。
注意
トップページに実装する
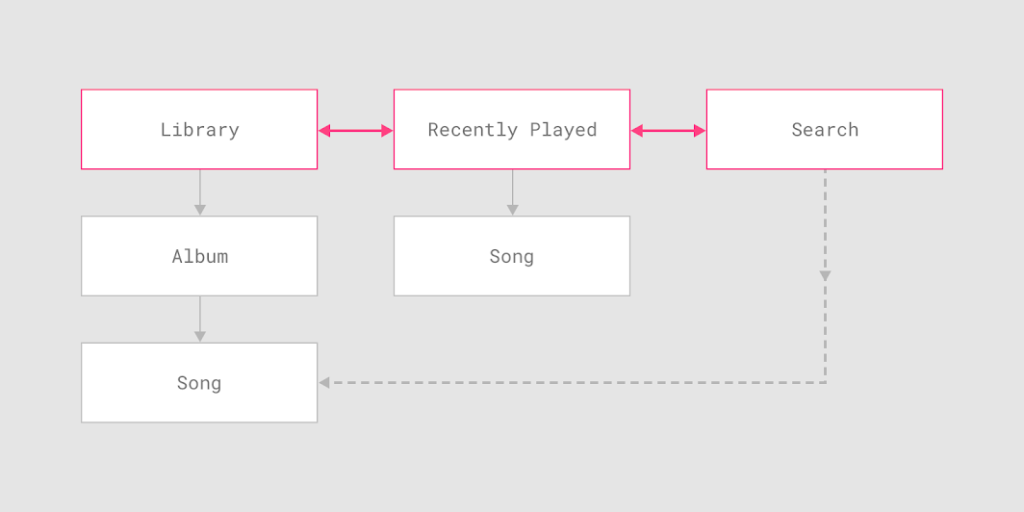
NavigationBarは、アプリのトップページの下部に表示します。
遷移先の画面は、トップレベルの同じ階層の画面に設定します。
上の画面構成で例えると、NavigationBarには「Library」「Recently Played」「Search」の3つを作ります。
階層の深いところにある「Song」は、「Library」「Recently Played」「Search」と並列するべきではありません。
アイコンは3〜5個
NavigationBarから遷移させることのできる画面の数は、3個〜5個です。
これより少なくても、多くてもダメです。
NavigationBar以外で画面遷移のメニューを作るには、Drawer()やTab()を使います。
Materialデザインでは、画面ナビゲーションについての推奨している考え方があるので、Understanding navigation – Material Designを見てみるといいかも。英語だけど。

「BottomNavigationBar」は「Material3仕様にならない」
NavigationBarはMaterial3仕様ですが、それ以前に使っていたBottomNavigationBarはMaterial3では使えません。
BottomNavigationBarは、たとえMaterialAppのtheme:でuseMaterial3: true になっていたとしても、自動でMaterial3仕様には変更されません。
なので、今後ナビゲーションバーを実装する場合は、Material3仕様のNavigationBarを使うことが推奨されています。
main.dartの全コード
import 'package:flutter/material.dart';
import 'package:navigationbar_try/screens/favorite_screen.dart';
import 'package:navigationbar_try/screens/info_screen.dart';
import 'package:navigationbar_try/screens/top_screen.dart';

void main() {
  runApp(const MyApp());
}

class MyApp extends StatelessWidget {
  const MyApp({super.key});

  @override
  Widget build(BuildContext context) {
    return const MaterialApp(
      title: 'NavigationBar',
      home: MyHomePage(),
    );
  }
}

class MyHomePage extends StatefulWidget {
  const MyHomePage({super.key});

  @override
  State<MyHomePage> createState() => _MyHomePageState();
}

class _MyHomePageState extends State<MyHomePage> {
  // NavigationBarから遷移する画面を、左から並べる順番にリストに入れる
  final _screens = [
    TopScreen(), // 1番目(0)
    FavoriteScreen(), // 2番目(1)
    InfoScreen(), // 3番目(2)
  ];

  // 表示する画面を指示する番号(初期値は「0」の TopScreen() )
  int _currentIndex = 0;

  @override
  Widget build(BuildContext context) {
    return Scaffold(
      body: _screens[_currentIndex],
      bottomNavigationBar: NavigationBar(
        selectedIndex: _currentIndex,
        destinations: [
          NavigationDestination(
              icon: Icon(Icons.android, color: Colors.green), label: 'トップページ'),
          NavigationDestination(
              icon: Icon(Icons.favorite, color: Colors.red), label: 'お気に入り'),
          NavigationDestination(
              icon: Icon(Icons.info, color: Colors.amber), label: 'お知らせ'),
        ],
        onDestinationSelected: (int index) => setState(() {
          _currentIndex = index;
        }),
      ),
    );
  }
}









コメント